
Implementing Virtual Background with React using MediaPipe
August 8, 2022
5 min

In this article, I will show you how to implement virtual background replacement. We will be using the WebRTC APIs to capture a stream from a camera, and then use Machine Learning with MediaPipe and WebAssembly to remove the background. If you want to see the full code sample, please scroll to the bottom of this article.
MediaPipe
MediaPipe is a cross-platform Machine Learning solution for live and streaming media that was developed and open-sourced by Google. Background replacement is just one of many features it has. It also includes real-time hand, iris and body pose tracking. For more information on what MediaPipe can do, you can read about it here.

The MediaPipe flow
Getting Started
Before we go further, let's start with the basics of getting a stream from the camera. To do this, let's first create a new React App or you can simply use an existing app.
npx create-react-app virtual-background
cd virtual-background
Capturing video stream from a User's Camera
We'll do all of our work in App.js. Clear out any unnecessary code so that your App.js looks similar to the example below.
1import './App.css';
2
3function App() {
4  return (
5
6  );
7}
8
9export default App;If you run yarn start you should just see a white screen.
Next, we want to add a useEffect that requests a user's media on app load. Add the following code before the return statement.
1useEffect(() => {
2  const constraints = {
3    video: { width: { min: 1280 }, height: { min: 720 } },
4  };
5  navigator.mediaDevices.getUserMedia(constraints).then((stream) => {
6    console.log(stream);
7  });
8}, []);navigator.mediaDevices.getUserMedia is the API that allows us to request for either audio or video devices that the browser has access to. For simplicity, we will only be using video and providing some requirements such as min width and height. As soon as the browser reloads, you should see an alert asking for access to the camera.
Since we are simply logging the stream, you should see a MediaStream in your developer console.
Viewing our camera stream
Now we can create a video element and set its source to our media stream. Since we are using React and need access to the video element, we will use the useRef hook. We'll first declare inputVideoRef and assign useRef() to it.
Next, we add a <video> element inside the top level div and give it the inputVideoRef. We are setting the srcObject of the video element to the stream we get from the camera. We will also need a canvas to draw our new view. So we create 2 more refs canvasRef and contextRef.
Lastly, in our useEffect, we will set the contextRef to the 2D context. Your App component should look like this:
1import { useEffect, useRef } from "react";
2import "./App.css";
3function App() {
4  const inputVideoRef = useRef();
5  const canvasRef = useRef();
6  const contextRef = useRef();
7
8  useEffect(() => {
9    contextRef.current = canvasRef.current.getContext("2d");
10    const constraints = {
11      video: { width: { min: 1280 }, height: { min: 720 } },
12    };
13    navigator.mediaDevices.getUserMedia(constraints).then((stream) => {
14      inputVideoRef.current.srcObject = stream;
15    });
16  }, []);
17  return (
18    <div className="App">
19      <video autoPlay ref={inputVideoRef} />
20      <canvas ref={canvasRef} width={1280} height={720} />
21    </div>
22  );
23}
24export default App;Once you save and refresh the app, you should see someone you recognize on your browser!
Installing Dependencies
We will now install MediaPipe's selfie_segmentation library.
npm install @mediapipe/selfie_segmentation
We can now import selfieSegmentation at the top of the file.
1import { SelfieSegmentation } from "@mediapipe/selfie_segmentation";Flow of Bytes
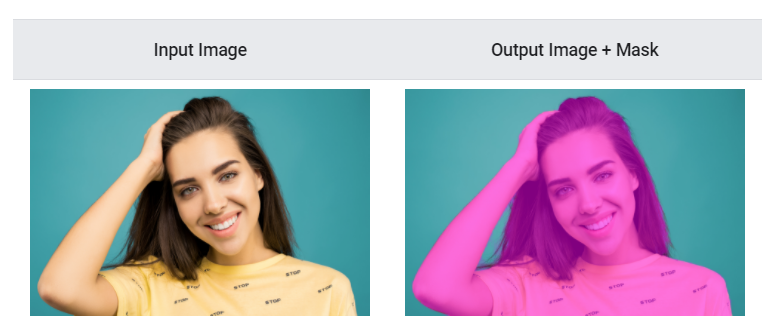
Before we go further, let's talk about the flow of bytes in our app. Our camera sends a stream of data to our browser, which gets passed to the video element. Then a frame/image at a point in time from the video element is sent to MediaPipe (locally), which is then run through the ML model to provide two types of results:
- a segmentation mask
- an image to draw on top of the segmentation mask
What that means is that we will have to constantly feed MediaPipe with data and MediaPipe will keep returning segmented data.
Selfie Segmentation
SelfieSegmentation has a constructor , a setOptions method and an onResults method. We will continue building our app by utilizing each of these.
Selfie Segmentation constructor - Inside of our existing useEffect, we instantiate an instance of selfieSegmentation. The locateFile argument can be your own data or the one below is the default one provided by MediaPipe.
1const selfieSegmentation = new SelfieSegmentation({
2  locateFile: (file) =>
3    "https://cdn.jsdelivr.net/npm/@mediapipe/selfie_segmentation/${file}",
4});Next, we setOptions also inside the same useEffect.
1selfieSegmentation.setOptions({
2  modelSelection: 1,
3  selfieMode: true,
4});modelSelection is 0 or 1. The general model is 0 and the landscape model is 1. Google Meets uses a variant of landscape. selfieMode will simply flip the image horizontally.
Send a Frame and Loop
Lastly, we want to create a sendToMediaPipe (also inside the useEffect). This method will call the send method on selfieSegmentation sending it a frame of inputVideoRef and constantly call itself via requestAnimationFrame . One thing to note is that there is a delay from when the browser requests a feed from the camera and when the camera sends back data. During this delay, the video element has no frames, but selfieSegmentation doesn't know that and always expects a frame or it will crash. So we have to check and ensure that the videoWidth is 0.
1const sendToMediaPipe = async () => {
2  // If there video isn't ready yet, just loop again
3  if (inputVideoRef.current.videoWidth) {
4    await selfieSegmentation.send({ image: inputVideoRef.current });
5  }
6  requestAnimationFrame(sendToMediaPipe);
7};Let's deal with the result!
Finally, when we get results back, we want to do something with these results. Let's create a function called onResults. This can be inside or outside the useEffect.
1const onResults = (results) => {
2  contextRef.current.save();
3  contextRef.current.clearRect(
4    0,
5    0,
6    canvasRef.current.width,
7    canvasRef.current.height
8  );
9  contextRef.current.drawImage(
10    results.segmentationMask,
11    0,
12    0,
13    canvasRef.current.width,
14    canvasRef.current.height
15  );
16  // Only overwrite existing pixels.
17  contextRef.current.globalCompositeOperation = "source-out";
18  contextRef.current.fillStyle = "#00FF00";
19  contextRef.current.fillRect(
20    0,
21    0,
22    canvasRef.current.width,
23    canvasRef.current.height
24  );
25
26  // Only overwrite missing pixels.
27  contextRef.current.globalCompositeOperation = "destination-atop";
28  contextRef.current.drawImage(
29    results.image,
30    0,
31    0,
32    canvasRef.current.width,
33    canvasRef.current.height
34  );
35
36  contextRef.current.restore();
37};Here are a few of the things that are happening.
- Clearing the canvas
- We draw on the results we get from the
segmentationMask, which are a set of pixes anywhere on our 1280 x 720 canvas that aren't determined to be human - We turn all those pixels green. Note: source-out colours
segmentationMask(the surroundings) and source-in colours the subject - We then draw on the pixels we get from the image result on top
We pass the onResults method to selfieSegmentation.onResults (inside the useEffect).
1selfieSegmentation.onResults(onResults);For more information, check out MediaPipe.
If you have any questions, feel free to reach out to me @_tkoriginal on Twitter.
Full Code Sample
1import { useEffect, useRef } from "react";
2import { SelfieSegmentation } from "@mediapipe/selfie_segmentation";
3import "./App.css";
4
5function App() {
6  const inputVideoRef = useRef();
7  const canvasRef = useRef();
8  const contextRef = useRef();
9
10  useEffect(() => {
11    contextRef.current = canvasRef.current.getContext("2d");
12    const constraints = {
13      video: { width: { min: 1280 }, height: { min: 720 } },
14    };
15    navigator.mediaDevices.getUserMedia(constraints).then((stream) => {
16      inputVideoRef.current.srcObject = stream;
17      sendToMediaPipe();
18    });
19
20    const selfieSegmentation = new SelfieSegmentation({
21      locateFile: (file) =>
22        `https://cdn.jsdelivr.net/npm/@mediapipe/selfie_segmentation/${file}`,
23    });
24
25    selfieSegmentation.setOptions({
26      modelSelection: 1,
27      selfieMode: true,
28    });
29
30    selfieSegmentation.onResults(onResults);
31
32    const sendToMediaPipe = async () => {
33      if (!inputVideoRef.current.videoWidth) {
34        console.log(inputVideoRef.current.videoWidth);
35        requestAnimationFrame(sendToMediaPipe);
36      } else {
37        await selfieSegmentation.send({ image: inputVideoRef.current });
38        requestAnimationFrame(sendToMediaPipe);
39      }
40    };
41  }, []);
42
43  const onResults = (results) => {
44    contextRef.current.save();
45    contextRef.current.clearRect(
46      0,
47      0,
48      canvasRef.current.width,
49      canvasRef.current.height
50    );
51    contextRef.current.drawImage(
52      results.segmentationMask,
53      0,
54      0,
55      canvasRef.current.width,
56      canvasRef.current.height
57    );
58    // Only overwrite existing pixels.
59    contextRef.current.globalCompositeOperation = "source-out";
60    contextRef.current.fillStyle = "#00FF00";
61    contextRef.current.fillRect(
62      0,
63      0,
64      canvasRef.current.width,
65      canvasRef.current.height
66    );
67
68    // Only overwrite missing pixels.
69    contextRef.current.globalCompositeOperation = "destination-atop";
70    contextRef.current.drawImage(
71      results.image,
72      0,
73      0,
74      canvasRef.current.width,
75      canvasRef.current.height
76    );
77
78    contextRef.current.restore();
79  };
80
81  return (
82    <div className="App">
83      <video autoPlay ref={inputVideoRef} />
84      <canvas ref={canvasRef} width={1280} height={720} />
85    </div>
86  );
87}
88
89export default App;


