
How to allow users to upload files to Sanity Studio and link them in the content editor
December 6, 2022
4 min


This tutorial assumes the reader has a minimal understanding of Sanity, Portable Text, and their implementations. An additional tool useful for cleaner file management is the Media Browser plugin for Sanity. If you lack the required understanding, we recommend you become familiar with these tools first.
Why implement a media manager into Sanity?
In a recent client request, the need arose to upload and link files, predominantly PDFs, into Sanity. The files would then be linked in the content editor and displayed on a new blog-like News section. We tried a simple approach at first, but it quickly proved ineffective. To help you avoid the same pitfall, below will be a presentation of the first attempt and its limitation, followed by the final, successful approach derived from the same initial idea.
Our first attempt allowing uploaded files to be linked in the PortableText content editor
A brief look through Sanity's schema types initiated the development process. Sanity contains a schema type called 'Reference.' This schema type allows one to declare a field that points to another piece of data within the CMS, allowing you to access that referenced piece of data outside its original purpose. As this was a failed attempt, there is no need to go through the entire process, but the thought process for implementation was as follows:
- Create a new field in the schema declaration in preparation for Portable Text (an 'Array' type made up of the 'Block' type)
- Add a custom annotation for an 'Object' type containing a field of type 'Reference.'
- Use the object above to attach previously/newly uploaded file references to highlighted pieces of text and interpret the data in the front end.
The approach was simple, and the implementation was very straightforward, but a Sanity limitation overlooked during the process rendered the entire process ineffective. The 'Reference' type in Sanity can only reference other documents, not assets such as the 'Image' or 'File' schema type.
Our second (successful) attempt
Throughout the implementation of the first approach, something became quite clear; it makes sense to be unable to reference Sanity assets. Why is that the case? There is no need to create a reference to an asset when we can just access Sanity assets directly.
The new approach then becomes as follows:
- Create a new field in the schema declaration in preparation for Portable Text (an 'Array' type made up of the 'Block' type)
- Add a custom annotation for an 'Object' type containing a field of type 'File' instead of type 'Reference' as was in the first approach.
- Use the object above to attach previously/newly uploaded file references to highlighted pieces of text and interpret the data in the front end.
The above is a simple modification that demanded only a few code changes. You can check out the code snippets below, along with commented explanations for each step of the coding process.
1) Sanity schema declaration
1// File name: articles.js
2
3export default {
4    name: 'articles',
5    type: 'document',
6    title: "News Articles",
7    fields: [
8      {
9          name: 'title',
10          type: 'string',
11          title: 'Article Title',
12          validation: (Rule) => Rule.required()
13      },
14      {
15          name: 'slug',
16          type: 'slug',
17          description: "Click 'Generate' button to generate slug based off article title. URL path for the article.",
18          title: 'Slug',
19          options: {
20              source: "title",
21              slugify: (input) => {
22                // Custom slugify function to properly format the slug as a URL path.
23                const newSlug = input.toLowerCase().replace(/\s+/g, '-');
24                return `/${newSlug}`;
25              }
26          },
27          validation: (Rule) => Rule.required()
28      },
29      {
30          name: 'mainText',
31          type: 'array',
32          title: "Main Text",
33          of: [{
34              type: 'block' ,
35              // The marks declaration below adds an additional option to the Sanity text editor.
36              // This option will allow us to attach files to highlighted pieces of text.
37              marks: {
38                annotations: [{
39                  // This can be the name of your choice but make note of it
40                  // as you will reference it when writing your front end code
41                  name: 'assetReference',
42                  type: 'object',
43                  title: 'File Reference',
44                  description: 'Link pieces of text to a previously uploaded file.',
45                  fields: [{
46                      name: 'file',
47                      // Notice the the type here is 'file'.
48                      // In the unsuccessful approach, it was originally 'reference'
49                      type: 'file',
50                      title: 'File Attachment'
51                  }]
52                }]
53              }
54          }]
55      }
56    ]
57}*Note - Don't forget to import the new schema into your schema.js file to have it included in your Sanity studio.
The new schema declaration should give you a text editor in Sanity with an added option for file attachment (see GIF below).
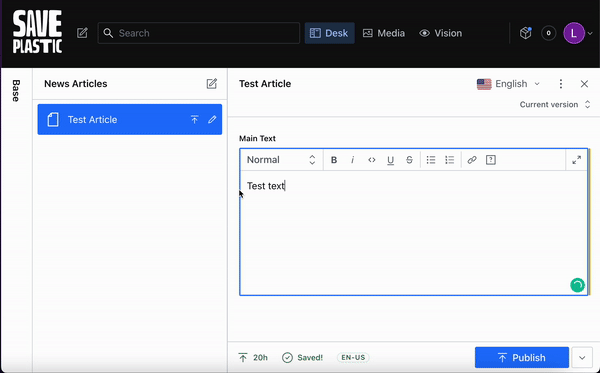
File attachment in action. Pay special attention to the 'File Reference' option in the text field top bar, available thanks to our schema declaration.
2) Interpreting Sanity data in the front end
Once the document is published, it's time to interpret the Sanity data in the front end. We begin by declaring a PortableText element and passing to it a value (our article's text editor content) and a component, the HTML element mapping for each text editor feature (paragraph, h1, h2, etc.). The snippet below has been simplified to display only the most essential code.
1import { PortableText } from '@portabletext/react';
2
3// Sanity to HTML Element mapping for Portable Text.
4const components = {
5  block: {
6    normal: ({ children }) => <p>{children}</p>,
7    h2: ({ children }) => <h2>{children}</h2>,
8  },
9  marks: {
10    em: ({ children }) => <em>{children}</em>,
11    strong: ({ children }) => <strong>{children}</strong>,
12    // Remember the name you provided in your schema for the file reference?
13    // You should use that same name here to declare your HTML element mapping for it.
14    assetReference: ({ children, value }) => {
15      // The file reference in the asset object has the form <_file>-<id>-<extension>
16      // We split the text string to get the individual pieces of information.
17      const [_file, id, extension] = value.file.asset._ref.split('-');
18      // The URL to access your file should be of the form
19      // https://cdn.sanity.io/files/{PROJECT_ID}/{DATASET}/{FILE ID}.{FILE EXTENSION}
20      return (
21        <a href={`https://cdn.sanity.io/files/${process.env.NEXT_PUBLIC_SANITY_PROJECT_ID}/${process.env.NEXT_PUBLIC_SANITY_DATASET}/${id}.${extension}?dl=${id}.${extension}`}>
22          {children}
23        </a>
24      );
25    },
26  },
27};
28
29export default function Article({ data }) {
30
31  return (
32    <div style={{
33        minHeight: '100vh'
34      }}
35      >
36      {/* data (in our case) is passed through getServerSideProps
37        and contains a Sanity object with the 'article' schema information. */}
38      <PortableText value={data.article.mainText} components={components} />
39    </div>
40  );
41}The 'File' type, much like Sanity's 'Image' type, does not return a direct URL for the assets, it instead returns an asset object containing information about the file which we want. It is then up to us to build the appropriate URL (as seen above).
Notice too that the URL we are building contains a query parameter '?dl={File Id}.{File extension}'. This is taken directly from the Sanity docs. This parameter indicates that we would like to directly download the file. If this isn't the case for you and you would like to open your PDF in the browser, you can omit this query parameter.
This gives us everything we need to make our files accessible to our users. See the final result below.
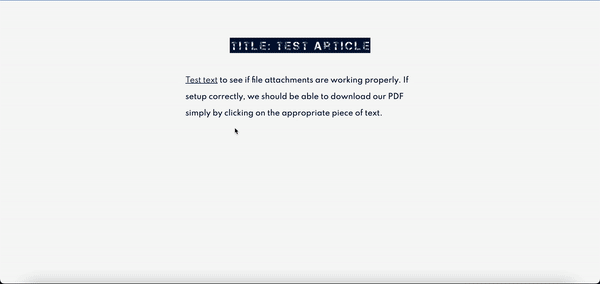
Final result of adding file attachment option to Sanity text field and interpreting the Sanity data in the front end.
Summary
Linking files to text in Sanity is a simple 2-step process. The first requirement is to declare, in your document schema, a text editor in preparation for Portable Text (Sanity Docs) with a custom annotation for file attachment. The second requirement is to fetch your Sanity document in the front end, render a Portable Text element and pass to it your text editor content as well as the HTML element mapping for each text editor feature (including your custom annotation). All files will be available for download in the front end through the following URL: https://cdn.sanity.io/files/{SANITY_PROJECT_ID}/{SANITY_DATASET}/{FILE_ID}.{FILE_EXTENSION}?dl={FILE_ID}.{FILE_EXTENSION}


