
How to Use On-demand ISR with Next.js and Sanity
June 30, 2022
4 min


Please note, this article is for Next.js version 12.
To learn more about what on-demand ISR is, you can see our deep-dive here. In this example, we'll set up an API endpoint in our Next.js application that receives webhook updates from Sanity. We'll then use the new res.revalidate() method that Next version ^12.2.0 provides to regenerate our static pages on demand!
Setup / Requirements
- Make sure your application is using Next.js ^12.2.0, and that you have a basic understanding of how Next.js works
- Make sure you have a Sanity project set up and that you have a basic understanding of how Sanity works
Create a Sanity Webhook
The first step is to create a webhook in Sanity to notify our Next.js application whenever a document is updated.
Log in to https://www.sanity.io/ and navigate to your project's settings:
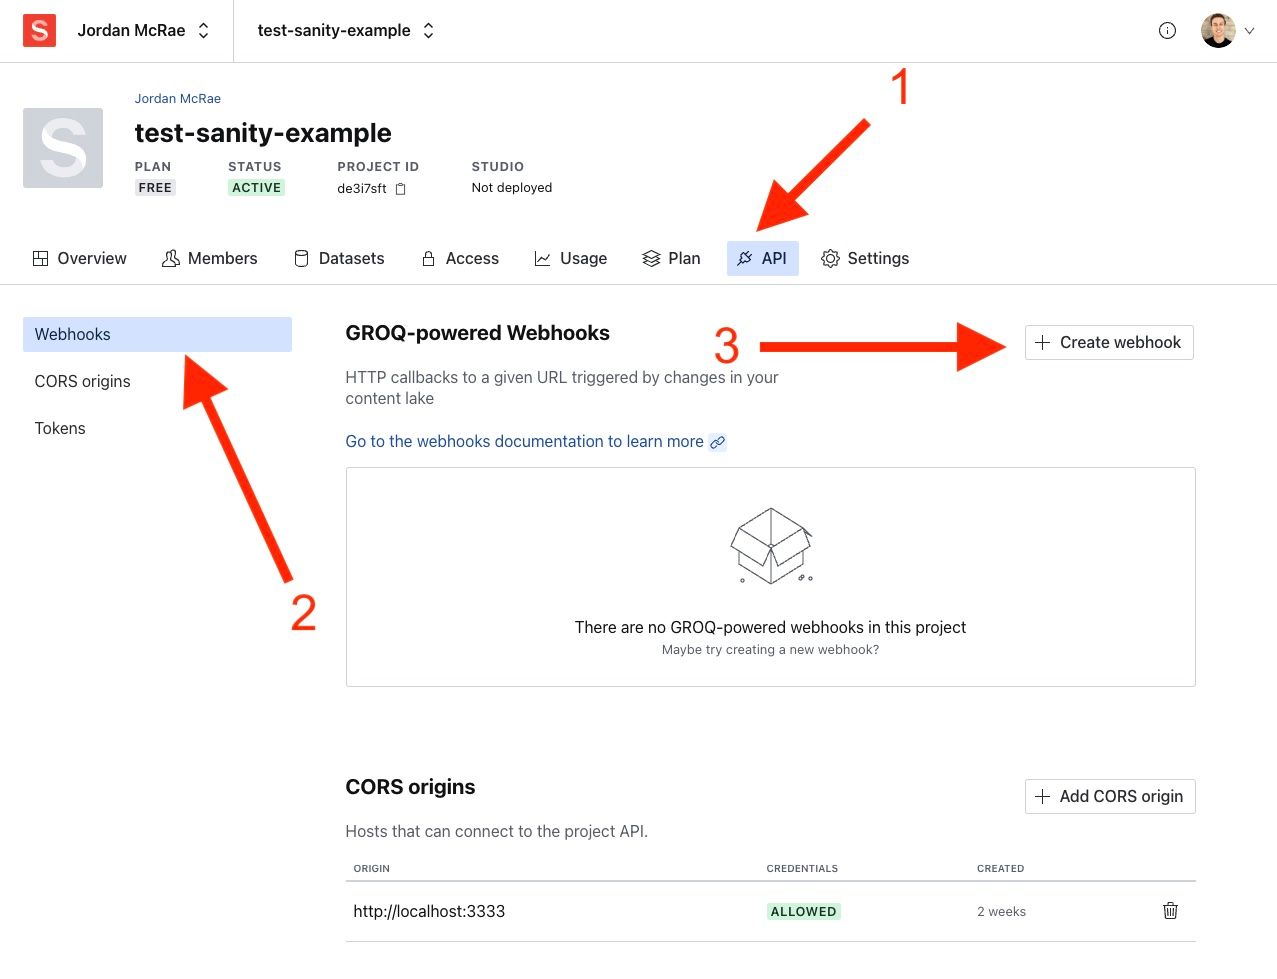
An example of the Sanity dashboard webhook settings menu
- Click on the API tab.
- Click on the Webhooks tab.
- Click on the Create webhook button.
Now we will add some configuration to our webhook.

Sanity webhook configuration
- Add a name for your webhook.
Example: Production On Demand ISR - Add the URL you’d like to receive your webhook to. Make sure you add the /api/revalidate route to your URL as well (more on this later)! Note: If you want to test this with localhost, you will need to use a tunnel service such as ngrok.
Example: https://your-local-ngrok-url.ngrok.io/api/revalidate - Choose the dataset you want to target.
- Make sure you have the "Create", "Update", and "Delete" options checked off under the trigger list. This will make sure the webhook will call our Next.js app whenever one of these actions happens.
- If you want to only trigger this webhook when a specific type of document is updated, you can specify it in the Filter field. In the example configuration above, you can see we are checking for the document type of
article.
Example: _type == 'article' - If you want to define a certain data structure that Sanity will send to your webhook, you can write a custom GROQ query in the Projection field. In this example, we are expanding an array of references called
topics.
Example:
1{
2  ...,
3  topics[] ->
4}Scroll down to the "Advanced Settings" section.
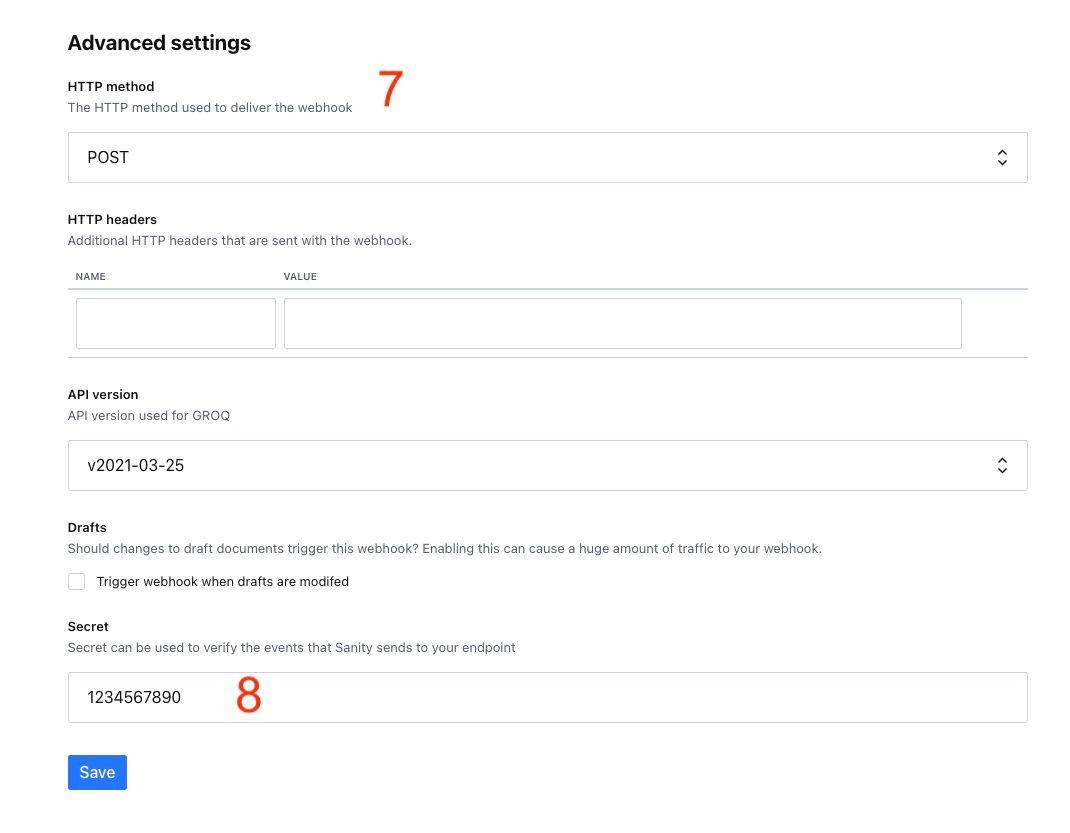
An example of some advanced settings in Sanity's webhook
7. Make sure your HTTP method is set to "POST".
8. Create a secret. Note: we will use this secret as an environment variable later in our Next.js app to verified that requests to our API are actually coming from Sanity.
9. Click "save".
Congrats, you’ve set up your Sanity webhook! Now let’s hook it up to our Next.js app.
Receiving the Webhook in Next.js
- Install the @sanity/webhook package:
yarn add @sanity/webhookornpm install @sanity/webook --save - Create or add your Sanity webhook secret to your project’s.env.local file:
SANITY_WEBHOOK_SECRET="1234567890" - If you’re deploying your app to Vercel, make sure you also add the
SANITY_WEBHOOK_SECRETvariable there as well.
In your Next.js app, create a new file called revalidate.js inside of your pages/api folder, and paste the following code into it:
1import { isValidSignature, SIGNATURE_HEADER_NAME } from '@sanity/webhook';
2
3const SANITY_WEBHOOK_SECRET = process.env.SANITY_WEBHOOK_SECRET;
4
5export default async function handler(req, res) {
6  const signature = req.headers[SIGNATURE_HEADER_NAME];
7  const isValid = isValidSignature(JSON.stringify(req.body), signature, SANITY_WEBHOOK_SECRET);
8
9  console.log(`===== Is the webhook request valid? ${isValid}`);
10
11  // Validate signature
12  if (!isValid) {
13    res.status(401).json({ success: false, message: 'Invalid signature' });
14    return;
15  }
16
17  try {
18    const pathToRevalidate = req.body.slug.current;
19
20    console.log(`===== Revalidating: ${pathToRevalidate}`);
21
22    await res.revalidate(pathToRevalidate);
23
24    return res.json({ revalidated: true });
25  } catch (err) {
26    // Could not revalidate. The stale page will continue to be shown until
27    // this issue is fixed.
28    return res.status(500).send('Error while revalidating');
29  }
30}
31
32Let’s quickly walk through what’s happening above.
- You'll notice we’re using one of Sanity's packages called webhook. This is a utility they created to help us validate that requests hitting this route are coming from Sanity.
a) This method requires that we stringify the JSON body request. - If the request is valid, we revalidate the page that has changed in Sanity. In this case, we are assuming that we have a route in the pages folder called
[slug].js. You can update this logic depending on your use case, but the logic above will regenerate a page atyour-domain.com/[slug].
** Note the new res.revalidate() method above provided by Next.js 12.2.0. This is where the magic of on-demand ISR happens! The argument it expects is a path such as /my-page.
And that’s all there is to it! Let's test it out.
Testing our ISR
- Build your application using the
next buildcommand. Assuming you are usinggetStaticPropson your page, you should see your static pages being generated. - Run your build using
next start. You should now see the Next.js server running. - Change one of your documents in Sanity, and click the publish button.
- You should see the
console.logmessages fire that we set in therevalidate.jsAPI file. - If you navigate to the page that you change, you will see the updated content almost immediately!

A demo gif of our working on-demand ISR
Important Notes
If you were previously using the revalidate method inside of getStaticProps, make sure you remove this if you are going to use on-demand ISR! You can still keep revalidate around if you'd like a fallback in case your webhook fails, but keep in mind that this will use more resources. You can learn more about this in our article, "What is On-demand ISR?".
Conclusion
Now that you have on-demand ISR set up, you can start building more complex logic into your revalidate handler, such as checking the document type, handling dynamic nested routes, and much more.
If this article was helpful, please let me know! If you need some extra help, you can reach out to me directly on Twitter as well.


